VersaLive Basics

Cutting the access ports
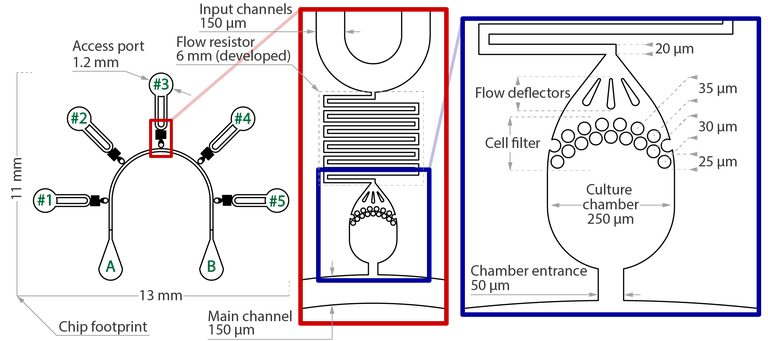
VersaLive chips have been developed using access ports 3 mm in diameter (resulting in about 25 μL in volume) but different diameters could be used for specific experimental requirements. It is important for the correct functioning of the device, however, that all ports in use have their content at the same height. Having all ports with the same diameter allows to work by measuring volumes and not heights.
When cutting out the ports of the chip, it is important to pay attention to their shape. Looking at the chip from a side, ports have to have a cylindrical shape. If the port appears to be smaller on one end (usually the top side of the chip), the cut needs to be repeated to remove the excess of PDMS. To simplify the process, it is convenient to proceed with the second cut when the punch is still into the PDMS from the first cut. When the first cut is done, pull back the punch half way into the PDMS and in that position complete the second cut.
Deformed ports can be caused by a dull blade. To prevent a rapid dulling of the punch, it is advisable to cut the chip on a softer surface than the bare lab workbench. On the market, cutting mats meant for this purpose are available. However, good results could be achieved also with any disposable pipette tip box commonly found in any laboratory.
Pipetting in VersaLive
To prevent the formation of air bubbles into the ports, the pipetting needs to happen very close to the glass slide. To minimize this risk, two strategies were found working reliably both for injecting and drawing:
- First touch the bottom of the port with the pipette tip. Then, slightly lift the tip before injecting the liquid.
- Pipette the liquid placing the pipette tip at an angle, at the junction between the PDMS and the glass.
Do not worry of damaging your sample. Unlike a common well, there is no risk for the tip to reach the cultivated cells.
To avoid evaporation of the port content, a layer of mineral oil for cell culture is always added.
Use of the vacuum line
As common for wells, vacuum can be used to empty the ports of VersaLive. It is key, however, for the correct functioning of VersaLive to never let the channels dry out. To safely use the vacuum line with VersaLive, it is sufficient to follow these few points:
- Adapt the vacuum tube to fit a fine point tip at the end of the line. A 10 μL or a 200 μL pipette tip is suitable for this purpose, avoid long serological pipettes
- Adjust the position of the vacuum valve at the minimum achievable
- Place the tip the farthest from the channel entrance and for the shortest time required to empty the port (1 second or less)
Channel wetting
For the wetting step, a hydrophilic channel surface is required. PDMS is a hydrophobic material but can become hydrophilic, for instance, by plasma treatment. The hydrophilic character of PDMS, however, tends to degrade over time. It was reported that low temperature can preserve PDMS chips in their hydrophilic state (Jahangiri F. et al., Microfluidics and Nanofluidics 2020).
We advise in storing ready-to-bond PDMS chips at room temperature and carry out the wetting step within minutes after the bonding on glass. In alternative, fully bonded chips (plasma activation, bonding on glass, at least 30 minutes at 80˚C) can be re-activated and then stored at -80˚C, ready to be used.
- Add 10 μL of PBS in port B of the chip and observe at the stereomicroscope the wetting of all channels up to the remaining ports.
- If capillary action is not enough to achieve the wetting of all channels:
- Fill all ports with 10 μL of PBS
- Place the chip in a desiccator
- Degas the chip applying vacuum for 15 minutes
- Check the result at the stereomicroscope and repeat if necessary
- VersaLive chips can be sealed with adhesive tape to prevent evaporation and stored at 4˚C for at least one week. Do not use mineral oil before cell loading
Cell culture
Cell culture is the central application for the VersaLive microfluidic platform. Depending on the nature of the experiment, it is possible to use VersaLive to grow cells using i) a static culture; ii) a single-input perfusion culture; iii) a multi-input perfusion culture.
The static cell culture is the mode of use that does not exploit perfusion on VersaLive. This mode of use is important during the adhesion phase of the cells, after the loading into the culture chambers.
A key aspect of growing cells in VersaLive is the ability to use perfusion. Using perfusion, every input delivered to the cells (e.g nutrients, drugs) is constant over time because continuously replenished by the active flow. Respect to a static culture as it is a flask or a well, perfusion cell culture allows a more consistent way of growing cells because the external environment is never depleted of its components.
Whenever all the cells cultivated in VersaLive need to receive a same stimulus, the single-input mode is the most convenient way to proceed.
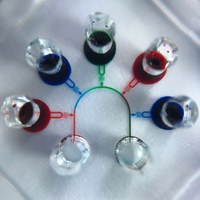
Alternatively, it is possible to deliver a different stimulus to each cultivation chamber by using VersaLive in multi-input mode.
Cell loading and static cell culture
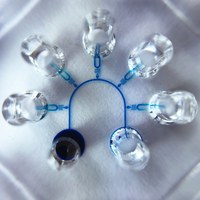
Cell loading is the first step for the culture of every cell line on VersaLive. Here is explained how to bring cells suspended in their cell medium into the microfluidic chambers and let them attach to the chip bottom surface. While adhering to the chip, cells are grown using a static cell culture to prevent any undesired movement due to flows across the chip. In general, a static cell culture in VersaLive is achieved having the same volume of cell medium in all ports of the chip (#1 to #5, A and B).
- Empty all ports from the PBS used for the channel wetting
- Add 10 μL of cell suspension (1—5•106 cells/mL) in port B. Cells will start flowing through the main channel and entering the chambers
- When a given chamber is filled with enough cells, add 10 μL of cell medium to the respective port to stop its filling
- When all chambers are filled, fill port A with 20 μL of cell medium
- Remove the cell suspension from port B and rinse it with cell medium or PBS
- Add 20 μL of cell medium to port B
- Fill up to 20 μL all chamber ports #1 to #5
- Add 2.5 μL of mineral oil to each reservoir to prevent the evaporation of the cell medium
- Place the chip in the incubator at 37˚C and 5% of CO2 until the cells are adherent to the bottom of the chip (a few hours or days, depending on the cell line)
Perfusion in single-input mode
This mode of using VersaLive is suitable for delivering a same stimulus (e.g. nutrients, starvation, drugs) to all cells at the same time.
- Remove content from ports #1 to #5 and B
- Replace content from ports A with suitable inputs (according to experimental plan)
- Add 2.5 μL of mineral oil in input port A

Perfusion in multi-input mode
This mode of using VersaLive is suitable for delivering independent stimuli (e.g. nutrients, starvation, drugs) to different cultivation chambers. This utilization mode is ideal for drug screening applications.
- Remove content from ports A and B
- Replace content from ports #1 to #5 with suitable inputs (according to experimental plan)
- Add 2.5 μL of mineral oil in input ports #1 to #5

Perfusion autonomy test
Perfusion autonomy of VersaLive chips may vary depending on the incubator environment. Parameters as temperature, humidity, gas flow rate and frequency of door opening tend to change the overall duration of the perfusion. To prevent drying out of the chip overnight, test your incubator prior to an experiment. According to your experimental needs, test a chip in single- or multi-input mode loading the ports with 20 μL of PBS and sealing them with 2.5 μL of mineral oil.
Long perfusion (> 12 hours in multi-input mode)
[ ! ] Note: The use of pipette tips is not compatible with the reversible plasma bonding
- Use 200 μL pipette tips cut to fit into the PDMS ports
- Add 90 μL of input and 2.5 μL of mineral oil in each input tip
- Empty outlet reservoirs (ports A and B) every 48 hours or less
Cell retrieval (PDMS removal upon reversible bond)
Applying the reversible plasma bonding, it is possible to have direct access to the cultivated cells by removing the PDMS. To ease the removal of the PDMS, it is possible to use a scalpel blade to insert between the PDMS and the glass slide. Once the contour of the chip is unbonded, it is possible to finish the delamination by pinching the sides of the chip until the PDMS is completely removed from the glass slide.
